Create eye-catching call-to-action buttons with simple mouse over effects that will help convert traffic and capture more leads!

One of the things that you can easily do to create a little more 'action' on your websites or squeeze pages is create a simple mouse over script that will either change the image, change the color or do something different when people put their mouse over that button or image.
With WordPress, even if you are not experienced with CSS (Cascading Style Sheets, is a kind of code that tells the browser how to render a web page), here is a simple css script to do this.
This will add some action to any call-to-action image on your WordPress Website!
Place Your Mouse Over the Image Below
(clicking will take you to the tutorial)
And there you are! Simple mouse over script to highlight any image and/or change the image when anyone places their mouse over it.
Admit it, it's kinda fun to keep running your mouse across them. Well, your website visitors will feel the same way. I am sure you can be more creative than what I have done here and the possibilities are almost endless. By creating these cool effects, it will also help trigger more clicks.
Don't let creating a CSS Stylesheet deter you, once you do it you will feel very accomplished.
Before You Start:
 There are several ways to edit your WordPress CSS stylesheet. If you are not familiar with any of them or unsure where to start, or maybe I lost you at CSS, I will try to keep this is as simple as possible
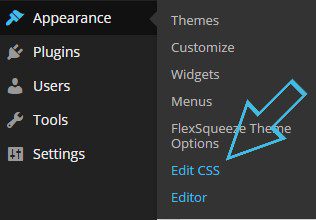
Almost all WordPress websites will have a css editor, if you are unable to locate one on your theme, Jetpack has a 'Custom CSS' editor. I really like the DIVI theme because I can put the code on the one page or post I want on.
Creatinga Mouse Over Effect – Part A
The following code is the css script that you will copy & paste to your Custom CSS Editor once you have it installed using JetPack. This will show a hover effect on and/or around an image. (Below the script you will see what to edit.)
If you are wanting to do this for multiple image sizes, you would have to create one for each image. This type of script is most effectively used for specific "call to action" images that are commonly used on your website. ie – 'Buy Now', 'Apply Now', 'Enter Now', etc.
/* =Custom CSS ———————————————– */ /*Mouse-over highlight START */
.box { width: 200px; height: 38px; border: 2px solid #550B00; padding: 0; }
.box:hover { -moz-box-shadow: 0 0 20px #550B00; -webkit-box-shadow: 0 0 20px #550B00; box-shadow: 0 0 20px #550B00; } /*Mouse-over highlight END */
Understanding & Editing the code above:
- Anything between the /*symbols*/ is nothing more than a reminder to you of what the code is, where it begins and where it ends. This is helpful when you are using several different custom CSS styles.
- Above you will notice two references to '.box'. box is the 'class' name that refers to this script and you will be referring to it later. The classname 'box' can be named anything you like to make it easier to remember. I use class names that name the call to action. For example, on this page, the classname for Sample #1 image is boxsample. Whatever you name it, make it all one word, no spaces or dashes, text only.
- width: 200px; height: 38px; – This is the exact width and the height of the image you are using. Adjust it for your image size.
- border: 2px solid #550B00; – This is the border width & border color of the image. Edit this to match your button/website colors.
- Anything in the .box:hover section has to do with when the mouse is placed over the image. (Remember: If you change the class name, you would need to change it here too. ie .yourclassname:hover) You can change the color and the shadow width. Play with it and you will see all the different effects. (If you mess it up, just paste the original back in and start again.)
Once you have pasted that script or your edited version and saved it to your Custom CSS from your WordPress admin, then you can move on to the next step, installing your new button on your website.
Method #1 – Part B
The hard part is over. Remember in Part A, we talked about 'Class' names. Well, this is where we will use them.
On your page/post where you have that image, all you would need to do is go to the 'Text Editor' (html editor) of your WordPress post and then add <div class="CLASSNAME"> in front of the image, and then close it with </div> after the image. The html for the image I have on this page is similar to this;
Resources:
Need some help with creating images & buttons? We use PaintShop Pro 2021 Ultimate. It is comparable to Photoshop, but at a fraction of the price. You will find it very easy to use and provide you with endless uses for editing or creating any type of image.
About the Author:
The SEO-Alien is a project started in 2009 regarding all things online marketing. The site started out more of a diary of predictions, suggestions and references to things I frequently used for online marketing... before social media marketing was even an option.
I hope you find the information and tools presented here useful and something worth sharing with others.
If there is anything else about online marketing or any online advertising strategy you think would be helpful, please let me know.